最近在整理项目中的aop功能模块,在使用了他人的gradle插件发现有不满意的地方,因此稍微了解了一下如何编写gradle插件,在此进行一下记录
一些跟gradle相关的基础资料,可以在我的另一篇博文中找到:Gradle介绍
gradle插件工程目录
想要编写gradle插件,我们首先需要自己组建好相应的工程目录,与其他的module不同,Android Studio并没有便捷的方式让我们一键生成相应的插件工程目录,我们需要自己把所需的文件夹跟文件一个个新建起来
插件工程目录截图如下: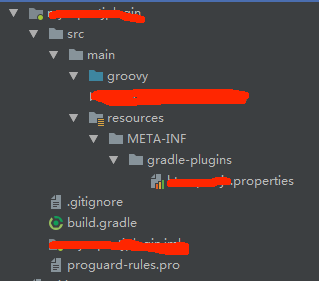
下面来逐一说明目录文件的作用:
groovy文件夹
这个文件夹下面保存的是groovy文件,是我们插件的源代码目录
resources/META-INF/gradle-plugins
这个文件夹下面有个xxx.properties文件,用于定义我们的插件名称,我们平时在build.gradle中写的:
1 | apply plugin: 'xxx' |
其中的xxx,就是该文件去后缀后定义的名称
文件的内容如下:
1 | implementation-class=插件实现类的全名 |
举个例子,比如插件的实现类如下:
1 | package com.superxlcr.plugin |
可以看到,其实我们在build.gralde调用apply plugin指令,就是在gradle的config阶段执行apply方法里面的内容而已
上述例子的文件具体内容如下:
1 | implementation-class=com.superxlcr.plugin.TestPlugin |
.gitignore
git管理工具追踪时忽略的文件,一般标记build文件夹即可:
1 | /build |
proguard-rules.pro
proguard混淆时的规则文件,一般使用随便一个module默认生成的即可:
1 | # Add project specific ProGuard rules here. |
build.gradle
我们gradle插件工程的配置文件,一般而言,配置如下:
1 | apply plugin: 'groovy' |
如果要获取一些跟Android Project相关的属性,以及执行一些注册Transform等操作,我们还需要引用Android提供的工具库:
1 | dependencies { |
增加extension
类似Android提供的com.android.application插件,可以在android定义的extension中修改很多属性值,我们的插件也想要自己的extension,要怎么做呢?
Android插件一个修改版本号属性值的例子:
1 | android { |
想要自己的extension很简单,只要在apply插件的时候,往project中添加注册即可:
1 | @Override |
定义的extension类如下:
1 | class TestExtension { |
如此一来,我们的插件就有了自己的extension,设置相应的extension时,其实就跟修改定义extension的对象一样:
1 | mytest { |
本地maven仓库上传
由于apply from本地的groovy文件是不能debug调试的,为了方便我们调试编写的gradle插件,我们一般会将插件上传到本地的maven仓库中
想要实现本地maven仓库上传非常简单,配置依赖相应的gradle插件即可,在build.gradle文件中加入:
1 | apply plugin: 'maven' |
编写完成后,先调用build task编译生成,然后调用uploadArchives task上传即可: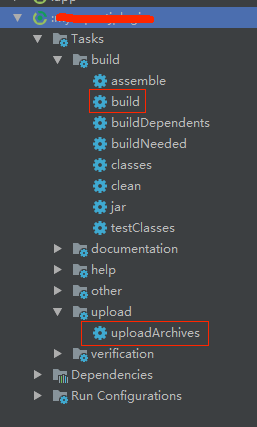
在使用时,我们只需要在总工程的build.gradle下加上本地maven仓库以及插件名称即可:
1 | buildscript { |
ps: 除了使用 maven 插件来上传以外,我们还可以通过 maven-publish 插件来把代码上传到本地仓库
具体配置大致如下所示:
1 | apply plugin: 'maven-publish' // 添加插件 |
配置完成后,执行publishToLocalMaven任务即可,发布位置应该在:用户文件夹/.m2/ 里