Android NDK初次学习

最近博主开始学习如何使用NDK,在此进行一下总结。

博主的IDE为Android Studio 2.3.1,接下来博主将演示如何在现有的项目上支持NDK。

下载NDK

首先,使用SDK Manager下载SDK Tools调试工具LLDB、编译工具CMake以及NDK:
download_pic1

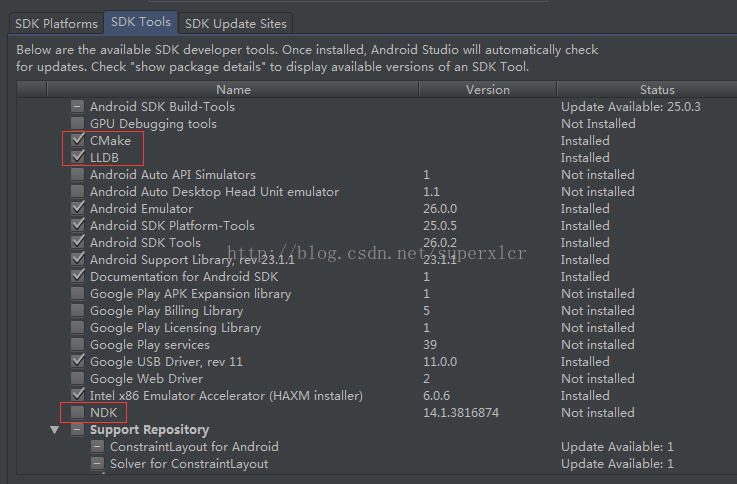
NDK也可以去官网进行下载:NDK下载地址

编写java文件

首先,我们编写一个Native工具类,里面定义了一个native方法获取字符串:

1
2
3
4
5
public class NativeUtils {

public static native String getNativeString(String str);

}

然后在我们的主界面打印这个字符串:

1
2
3
4
5
6
7
8
9
10
public class MainActivity extends AppCompatActivity {

@Override
protected void onCreate(Bundle savedInstanceState) {
super.onCreate(savedInstanceState);
setContentView(R.layout.activity_main);
TextView tv = (TextView) findViewById(R.id.tv);
tv.setText(NativeUtils.getNativeString("Java world"));
}
}

接着我们在app根目录下创建一个jni文件夹:
create_jni_folder_pic2

创建完成后,我们多了一个cpp的文件夹(实际上是jni文件夹,Android视图进行了简化):
new_cpp_folder_pic3

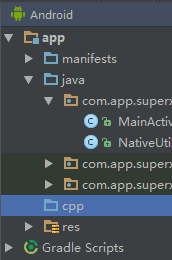
然后我们Make Project,使其Java代码生成.class文件,并打开终端:
terminal_pic4

定位到生成.class文件的目录下:

1
cd app\build\intermediates\classes\debug

使用java命令的jni框架生成.h文件:

1
javah -jni 完整包名.类名

然后使用project 视图找到我们的.h文件:
cut_h_pic5

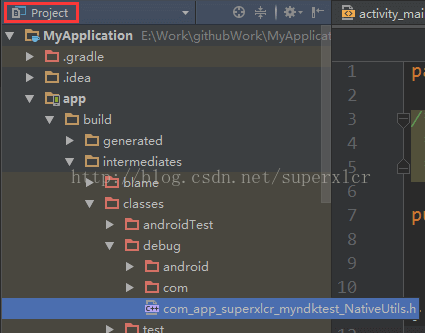
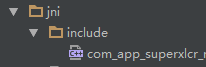
把生成的.h文件剪贴到我们的jni文件夹中新建的include目录下:

jni_include_h_pic6

链接到Gradle

首先我们需要在工程的Project Structure 下设置NDK 的目录:
ndk_dir_pic7

在local.properties文件中添加ndk.dir属性亦可达到同样效果:
ndk_dir_2_pic8

然后我们在cpp文件夹下创建空白的NativeUtils.cpp文件

接着打开Project视图,在工程的根目录下新建CMakeLists.txt 文件:

1
2
3
4
5
6
7
8
9
10
11
12
13
14
15
16
17
18
19
20
21
22
23
24
25
26
# Sets the minimum version of CMake required to build your native library.
# This ensures that a certain set of CMake features is available to
# your build.

cmake_minimum_required(VERSION 3.4.1)

# Specifies a library name, specifies whether the library is STATIC or
# SHARED, and provides relative paths to the source code. You can
# define multiple libraries by adding multiple add.library() commands,
# and CMake builds them for you. When you build your app, Gradle
# automatically packages shared libraries with your APK.

add_library( # Specifies the name of the library.
# so动态链接库文件名
NativeUtils

# Sets the library as a shared library.
SHARED

# Provides a relative path to your source file(s).
# cpp文件名
app/src/main/jni/NativeUtils.cpp )

# Specifies a path to native header files.
# .h头文件位置
include_directories(app/src/main/jni/)

在Android视图中,选择我们的cpp文件夹,选择链接到Gradle:
link_cmake_gradle_pic9

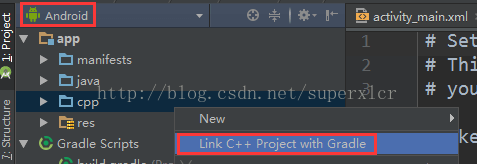
选择CMake编译系统,并选择我们的CMakeLists.txt:
select_cmake_lists_pic10

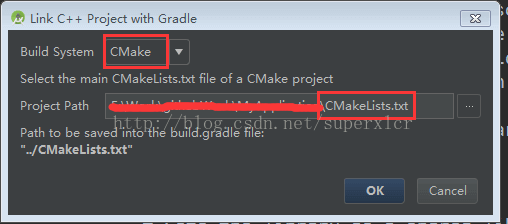
我们也可以通过在app模块的build.gradle的android的属性添加一下代码达到相同的效果:

1
2
3
4
5
externalNativeBuild {
cmake {
path '../CMakeLists.txt'
}
}

进行Gradle sync 同步过后,我们可以开始进行cpp代码编写了。

编写cpp文件

首先我们编写NativeUtils.cpp 文件,实现具体的Native方法:

1
2
3
4
5
6
7
8
9
10
11
12
13
14
15
16
17
18
19
20
21
22
23
#include <iostream>
#include "com_app_superxlcr_myndktest_NativeUtils.h"

using namespace std;

/*
* Class: com_app_superxlcr_myndktest_NativeUtils
* Method: getNativeString
* Signature: (Ljava/lang/String;)Ljava/lang/String;
*/
JNIEXPORT jstring JNICALL Java_com_app_superxlcr_myndktest_NativeUtils_getNativeString
(JNIEnv * env, jclass clz, jstring str) {
// 获取Java层传来的字符串
jboolean* isCopy;
const char* nativeChars = env->GetStringUTFChars(str, isCopy);
// 构造返回字符串
string nativeStr = "Native world get Message :";
nativeStr.append(nativeChars);
// 释放Java字符串资源
env->ReleaseStringUTFChars(str, nativeChars);
// 返回结果
return env->NewStringUTF(nativeStr.c_str());
}

然后我们在NativeUtils.java 文件中添加如下代码载入动态链接库:

1
2
3
static {
System.loadLibrary("NativeUtils");
}

编译运行的效果如下:
_pic11

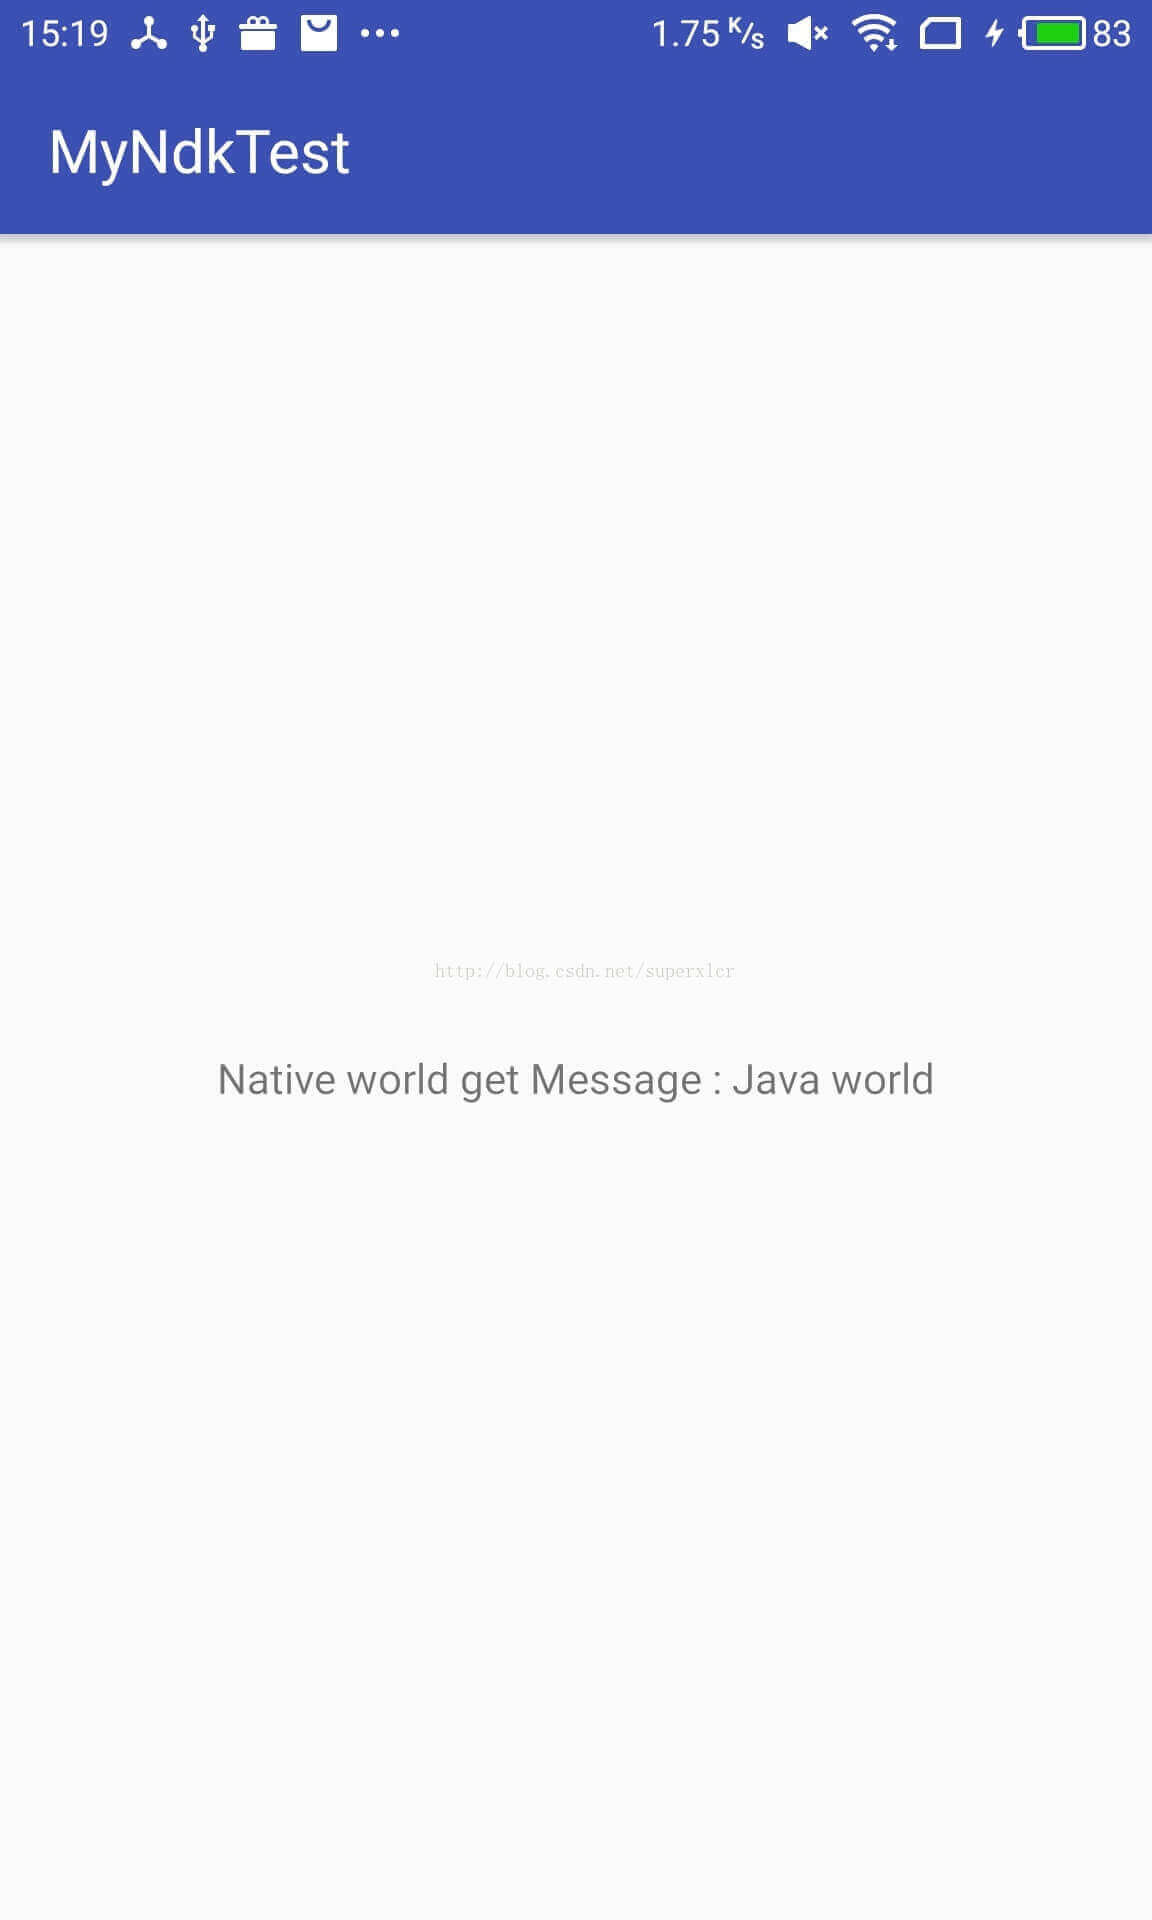
更多关于NDK的信息请参考官方的链接:https://developer.android.com/ndk/index.html#Revisions