Android之LayoutInflater探索

LayoutInflater是一个我们在Android编程中经常使用到的用于生成解析布局文件的类,在这篇博客中我们将探索LayoutInflater的相关知识。

获取LayoutInflater实例

想要使用LayoutInflater,我们必须先获取它的实例,在Android中我们有如下两种方法:

1
2
3
4
// 方法一
LayoutInflater LayoutInflater = (LayoutInflater) context.getSystemService(Context.LAYOUT_INFLATER_SERVICE);
// 方法二
LayoutInflater LayoutInflater = LayoutInflater.from(context);

其实方法二只是方法一的包装而已,不过通常博主都会使用方法二,因为比较方便:

1
2
3
4
5
6
7
8
public static LayoutInflater from(Context context) {
LayoutInflater LayoutInflater =
(LayoutInflater) context.getSystemService(Context.LAYOUT_INFLATER_SERVICE);
if (LayoutInflater == null) {
throw new AssertionError("LayoutInflater not found.");
}
return LayoutInflater;
}

LayoutInflater使用

在获取了LayoutInflater的实例后,我们可以使用它来解析我们的布局了。在LayoutInflater中给出的解析函数有如下四种重载:

1
2
3
4
5
6
7
8
// 布局索引号,父View
inflate(int resource, ViewGroup root)
// 包含布局内容的PULLxml解析器,父View
inflate(XmlPullParser parser, ViewGroup root)
// 布局索引号,父View,是否绑定到父View
inflate(int resource, ViewGroup root, boolean attachToRoot)
// 包含布局内容的PULLxml解析器,父View,是否绑定到父View
inflate(XmlPullParser parser, ViewGroup root, boolean attachToRoot)

LayoutInflater源码

所有函数均返回一个View,由于前三项重载函数最后均会调用最后一项重载函数,因此在此我们分析最后一个重载函数。在此之前,先列出一些LayoutInflater中定义的标签常量:

1
2
3
4
5
private static final String TAG_MERGE = "merge";
private static final String TAG_INCLUDE = "include";
// blink特殊标签,具有闪烁的效果,这东西貌似在1994年左右诞生,所以叫TAG_1995?
private static final String TAG_1995 = "blink";
private static final String TAG_REQUEST_FOCUS = "requestFocus";

重载的解析函数:

1
2
3
4
5
6
7
8
9
10
11
12
13
14
15
16
17
18
19
20
21
22
23
24
25
26
27
28
29
30
31
32
33
34
35
36
37
38
39
40
41
42
43
44
45
46
47
48
49
50
51
52
53
54
55
56
57
58
59
60
61
62
63
64
65
66
67
68
69
70
71
72
73
74
75
76
77
78
79
80
public View inflate(XmlPullParser parser, ViewGroup root, boolean attachToRoot) {
synchronized (mConstructorArgs) {

final AttributeSet attrs = Xml.asAttributeSet(parser);
// 用于实例化View的参数
Context lastContext = (Context)mConstructorArgs[0];
mConstructorArgs[0] = mContext;
// 返回结果
View result = root;

try {
// 查看起始节点是否为空
// Look for the root node.
int type;
while ((type = parser.next()) != XmlPullParser.START_TAG &&
type != XmlPullParser.END_DOCUMENT) {
// Empty
}

if (type != XmlPullParser.START_TAG) {
throw new InflateException(parser.getPositionDescription()
+ ": No start tag found!");
}

final String name = parser.getName();

// 解析merge特殊标签
if (TAG_MERGE.equals(name)) {
if (root == null || !attachToRoot) {
throw new InflateException("<merge /> can be used only with a valid "
+ "ViewGroup root and attachToRoot=true");
}

rInflate(parser, root, attrs, false);
} else {
// 解析blink特殊标签
// Temp is the root view that was found in the xml
View temp;
if (TAG_1995.equals(name)) {
temp = new BlinkLayout(mContext, attrs);
} else {
temp = createViewFromTag(root, name, attrs);
}

ViewGroup.LayoutParams params = null;

if (root != null) {
// Create layout params that match root, if supplied
params = root.generateLayoutParams(attrs);
if (!attachToRoot) {
// Set the layout params for temp if we are not
// attaching. (If we are, we use addView, below)
temp.setLayoutParams(params);
}
}

// 开始解析子View
// Inflate all children under temp
rInflate(parser, temp, attrs, true);

// We are supposed to attach all the views we found (int temp)
// to root. Do that now.
if (root != null && attachToRoot) {
root.addView(temp, params);
}

// Decide whether to return the root that was passed in or the
// top view found in xml.
if (root == null || !attachToRoot) {
result = temp;
}
}

}
...

return result;
}
}
}

代码标有注释,一路过来应该不难看懂。在此我们不分析特殊的标签解析,因此我们的代码应该一路执行至第42行,调用了createViewFromTag方法:

1
2
3
4
5
6
7
8
9
10
11
12
13
14
15
16
17
18
19
20
21
22
23
24
25
26
27
View createViewFromTag(View parent, String name, AttributeSet attrs) {
...

try {
View view;
if (mFactory2 != null) view = mFactory2.onCreateView(parent, name, mContext, attrs);
else if (mFactory != null) view = mFactory.onCreateView(name, mContext, attrs);
else view = null;

if (view == null && mPrivateFactory != null) {
view = mPrivateFactory.onCreateView(parent, name, mContext, attrs);
}

if (view == null) {
if (-1 == name.indexOf('.')) {
view = onCreateView(parent, name, attrs);
} else {
view = createView(name, null, attrs);
}
}

if (DEBUG) System.out.println("Created view is: " + view);
return view;

}
...
}

该方法有多处调用了onCreateView或createView来生成解析的顶层View,onCreateView方法最终会调用createView方法,因此我们一起来看看createView方法:

1
2
3
4
5
6
7
8
9
10
11
12
13
14
15
16
17
18
19
20
21
22
23
24
25
26
27
28
29
30
31
32
33
34
35
36
37
public final View createView(String name, String prefix, AttributeSet attrs)
throws ClassNotFoundException, InflateException {
// 缓存构造函数
Constructor<? extends View> constructor = sConstructorMap.get(name);
Class<? extends View> clazz = null;

try {
Trace.traceBegin(Trace.TRACE_TAG_VIEW, name);

// 获取构造函数,并判断是否可以实例化View
if (constructor == null) {
// Class not found in the cache, see if it's real, and try to add it
clazz = mContext.getClassLoader().loadClass(
prefix != null ? (prefix + name) : name).asSubclass(View.class);

...
constructor = clazz.getConstructor(mConstructorSignature);
sConstructorMap.put(name, constructor);
}
...

// 传入View参数,第一项为Context,第二项为View参数
Object[] args = mConstructorArgs;
args[1] = attrs;

final View view = constructor.newInstance(args);
// 为ViewStub对象设置LayoutInflater
if (view instanceof ViewStub) {
// always use ourselves when inflating ViewStub later
final ViewStub viewStub = (ViewStub) view;
viewStub.setLayoutInflater(this);
}
return view;

}
...
}

适当添加了注释,代码并不难看懂,主要是通过Java的反射机制实例化了对应的View,并通过缓存View的构造函数提高实例化速度。
回到我们的inflate方法,第47行判断我们传入的root(即父View)是否为空,若不为空则生成对应的测量标准(因此当我们解析一个布局的时候一定要传入对应的父View,否则无法生成正确的测量标准将导致解析出来的布局大小不正确)。

再继续往下执行,在第59行代码调用了rInflate方法开始解析我们的布局顶层View的子View:

1
2
3
4
5
6
7
8
9
10
11
12
13
14
15
16
17
18
19
20
21
22
23
24
25
26
27
28
29
30
31
32
33
34
35
36
37
38
39
40
41
42
43
void rInflate(XmlPullParser parser, View parent, final AttributeSet attrs,
boolean finishInflate) throws XmlPullParserException, IOException {

// 解析迭代次数
final int depth = parser.getDepth();
int type;

while (((type = parser.next()) != XmlPullParser.END_TAG ||
parser.getDepth() > depth) && type != XmlPullParser.END_DOCUMENT) {

if (type != XmlPullParser.START_TAG) {
continue;
}

final String name = parser.getName();

// 处理requestFocus标签
if (TAG_REQUEST_FOCUS.equals(name)) {
parseRequestFocus(parser, parent);
} else if (TAG_INCLUDE.equals(name)) { // 处理include标签
if (parser.getDepth() == 0) {
throw new InflateException("<include /> cannot be the root element");
}
parseInclude(parser, parent, attrs);
} else if (TAG_MERGE.equals(name)) { // 处理merge标签
throw new InflateException("<merge /> must be the root element");
} else if (TAG_1995.equals(name)) { // 处理blink标签
final View view = new BlinkLayout(mContext, attrs);
final ViewGroup viewGroup = (ViewGroup) parent;
final ViewGroup.LayoutParams params = viewGroup.generateLayoutParams(attrs);
rInflate(parser, view, attrs, true);
viewGroup.addView(view, params);
} else {
final View view = createViewFromTag(parent, name, attrs);
final ViewGroup viewGroup = (ViewGroup) parent;
final ViewGroup.LayoutParams params = viewGroup.generateLayoutParams(attrs);
rInflate(parser, view, attrs, true);
viewGroup.addView(view, params);
}
}

if (finishInflate) parent.onFinishInflate();
}

有了注释该方法并不难懂,该方法会一直迭代调用自身直到xml文件解析完毕,是一个挺耗时的过程。
回到我们的inflate方法,在第63行,我们判断root是否为空,若不为空且我们设定了布局需要绑定到父View(attachToRoot == true),那么我们的布局就会添加到父View中,并最终解析的返回结果为父View(第70行);若为空或不绑定,则返回的结果为我们需要解析的布局的顶层View。

以下为LayoutInflater#inflate工作流程图:
LayoutInflater#inflate工作流程图

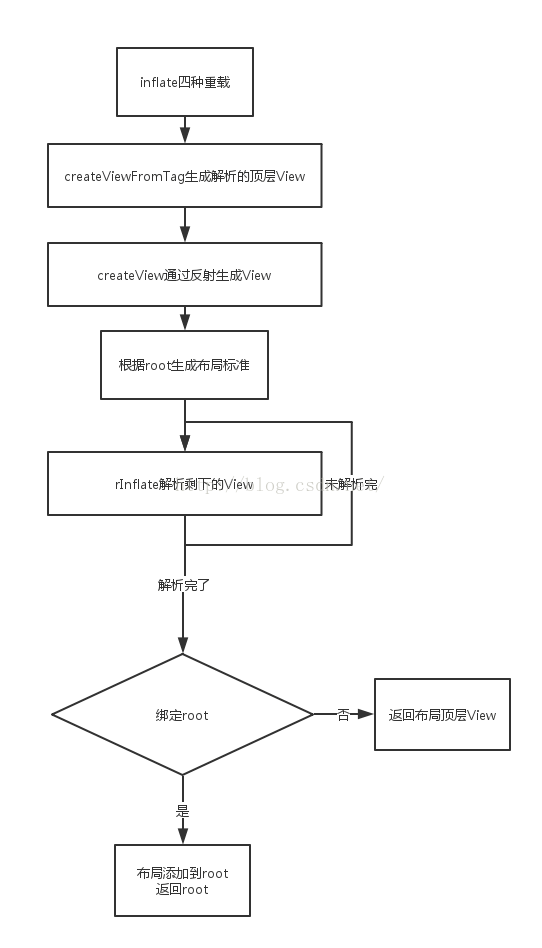
总而言之,当我们使用inflate方法的时候,一定要记得加入root参数,这样我们解析的布局文件大小才能正确无误,要是希望布局文件解析完后添加到root中,只需把attachToRoot设为true即可。